One of the most neglected aspects of the application for medical residency and fellowship is the photograph. The ERAS Residency Application photo can be a key component of our applications. Here are several reasons why:
- “First impressions always matter”. Regardless of the field, a professional picture can make a very good first impression about yourself. Some people may ask why?. As an example, think about the selection process done in many companies or institutions nowadays. It is believed that approximately 40 % of employers use social media sites to screen and recruit potential candidates and that they strongly agree that a professional looking picture can aid to boost a candidate’s chances of being considered for the job. Now, even though residency programs may not look into your social media profiles due to lack of time (some may do it), they will definitely see your photograph as a gate to your personality.
- It can show your determination. A high-definition photo, in which the candidate is wearing professional clothes, is well-groomed, has an expression that shows empathy and happiness of being applying for his or her dream job will reveal that you are really serious about your goals and dreams. In the other hand, the opposite to this will probably denote that you don’t care that much about it. You probably worked hard and struggled to be where you are now, therefore, keep up the good work and don’t give up yet. “There’s one more round to go”.
- It can display your personality. Your photo will be used by programs to identify you and your personality. If you are a very kind and cheerful person, you should try to show it. But if you show something completely different in a bad picture with a bad expression, they may never get to know how great you are. The specifications in ERAS state: “natural expression”, don’t confuse that with a “serious expression”. You can try a nice and natural smile (not fake). Try to demonstrate yourself in a picture. Remember, your picture may be the only thing that they’ll see because if it’s not good enough, they might not grant you an interview to see you being much better than that boring and poor picture.
- Reminder after the interviews. Names are really difficult to remember, and more when we come from all over the world with our “difficult names”. However, a picture can say a thousand words, and in this case, it can help them to remember you after the interview. If you are smiley and cheerful, and your picture shows that, they will say: “I remember that person and that personality”.
- It looks really cool. Let’s accept it, we all like to have a nice picture about ourselves.
A good picture can really make the difference. The best option should be using a professional photo service that can offer a high-definition digital image. There are several ways to do it. The choice depends on your budget. Some services can be very expensive (200-300 dollars) but they offer the best quality. Others may be cheaper options that can also provide a good quality photography. Finally, you can also try to do it by yourself, but to do so you will need to have a good camera, an excellent background, and good illumination.
Professional services can offer to take the photography, prepare your set appropriately, choose the correct background color, clothing tips, and others. Although this service can be expensive, we should remember that we have spent so much effort and money to be in this moment. In this level of competitiveness, the little details can make a difference. Some of the professional service options can be found online doing a google search “ERAS application photo”:
ERAS photo format requirements:
- It must be in the Joint Photographic Experts Group (JPEG) format.
- The maximum file size accepted is 100 KB
- It must be no larger than 2.5 by 3.5 inches in size (which is a tiny size and very difficult to maintain a high quality).
- It must be a clear, full front view of your head and shoulders. Your face should be in the middle of the photograph, and your expression should be natural with your eyes open and looking directly ahead.
Some of the professional services may offer within the package to format the picture for the ERAS requirements. In case that they don’t, you will receive a high-definition image that is way too big (size in pixels or inches) and heavy (usually more than 1 MB which is too heavy for the ERAS requirement). Trying to format this images can be very frustrating and difficult. This is why I would like to discuss that in a greater detail.
How to format your photography for the ERAS residency application
I would like to explain two ways to do it. The decision depends on which operating system you have: windows vs mac.
Formatting option for Windows users only:
The easiest way to do it is by using a program called “paint net”. This is not the paint program that comes with windows. We will need to download it first on the internet and then use it. This is what we will need to do:
- Download paint net: https://www.getpaint.net/. When you open this link, the developer’s website will appear. Click the option “get it now” at the upper right corner of your screen.
- Install the app. Follow the usual steps for installing any program in windows.
- After you have finished installing the app, go to your photography file and with a right-click choose open with and then paint net.
- Once your image is opened, go to “image” in the upper toolbar and select “resize”.
- Now you just need to change the following settings:
- Resolution: write 150 pixels per inch – PPI.
- Print size: write in width 2,5 inches and then the height will get resized automatically, however, if the height is more than 3,4 inches you can try doing the exact opposite; this means writing first the height as 3,5 and then verify that the width is not bigger than 2,5 inches.
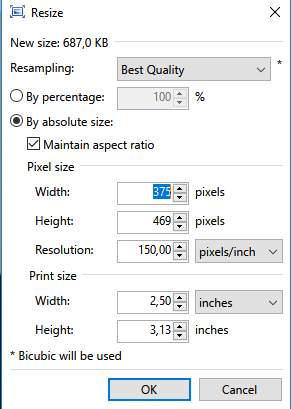
- Once you have done this changes click ok and then go to file and save as in the toolbar. After you select the destination where you want to save your file inside your computer, you will be asked about the quality of the picture. What I suggest doing is selecting the one that makes the file size to be less than 100 KB that will accomplish the ERAS requirement.
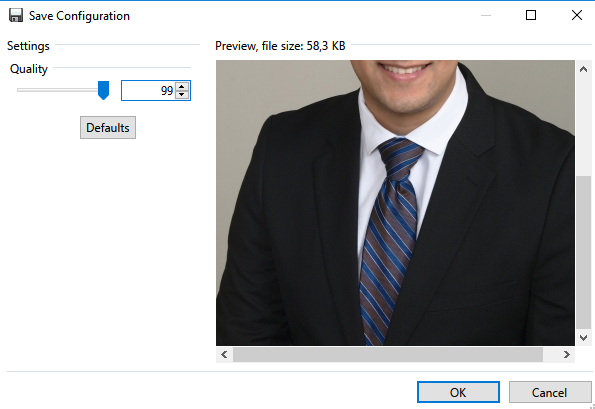
You can note that in this picture above, the file size is 58,3 which is adequate for the ERAS application.
Formatting option for Windows and Mac users:
The other option can be achieved by using Photoshop. These are the steps to follow:
- Open your picture using Photoshop.
- Go to the toolbar and select image and then image size.
- Choose the width as 2,5 inches and then the height will get resized automatically, however, if the height is more than 3,4 inches you can try doing the exact opposite; this means writing first the height as 3,5 and then verify that the width is not bigger than 2,5 inches.
- Select the resolution as 150 PPI (pixels per inch).
- Select the resample option as “bicubic for reduction” and click ok.
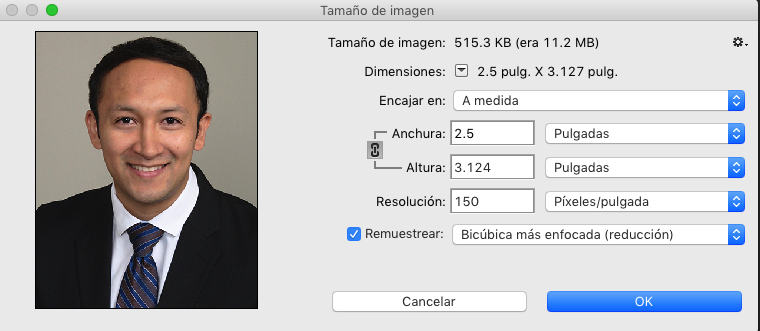
- Then go to file and save as, select the file location and click save.
- A pop-up will appear making you select the quality of the picture. Select the one that makes the file size to be lower than 100 kb.
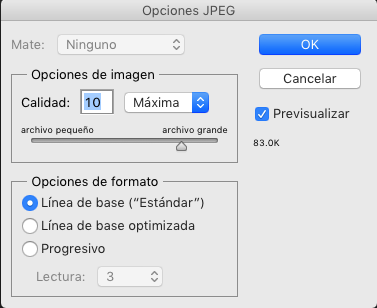
Here you can note that in the above picture, under “previsualizar” or preview in English, the file size is 83 kb which is fine because is less than the 100 kb required.
This is the easiest and better option formatting your picture. It is really hard to have an outstanding quality for this size and weight of the file, however, you can achieve a good quality doing this process that I have already described.
How to upload your photo in ERAS (ECFMG for IMG’s):
- Go to ecfmg.org. and open your oasis account.
- Once inside of your account, go to the left column of options and select the one from the bottom called “ERAS support service”.
- Click upload and select photograph.
- Read the information carefully and after you have finished, pick “choose file” and select the correct file from your computer.
- Click on upload file, and after you have done it a message will appear saying that the photo has been uploaded and it’ll take a few hours to days to be uploaded in your ERAS application. If the upload process fails, there may be something wrong with your photo. In that case, verify that the photograph you chose was the correct one and the formatting is adequate.
Our photo is one key aspect of the application and that’s why I decided to write this post trying to solve the questions you may have about it. Thank you very much for reading. I hope you have found this information helpful. Please, leave your comments below or subscribe to our newsletter to get more information about the residency process. Good luck!
Continue to:
- Aortic Stenosis Severity Classification - 09/22/2020
- Carboplatin (Paraplatin) - 04/07/2019
- How to test for Vitamin D deficiency? - 09/29/2018